How to Transfer Data from iPhone to PC
On the memory of your iPhone you have a lot of files and you are afraid of running out of space sooner or later. You would, therefore, like to transfer the photos, videos and any other files that you do not need to have on your smartphone in the hard disk of your computer. But there is a problem: your computer does not recognize the iPhone and therefore you do not know how to proceed. Is this the way it is? Then don’t worry, because you’ve come to the right place to solve your problem.
This guide will show you how to transfer data from iPhone to PC, recommending some methods to synchronize the two devices with the use of official and third-party applications. I will also suggest some tips for using the default tools of the operating system you are using.
It is not required that you have specific skills, as everything I will illustrate is within anyone’s reach. You’re more relaxed now, aren’t you? What you need to do is simply taking a few minutes of your time to read this tutorial and be able, therefore, to achieve your goal, thanks to my advice. Are you ready to start? I wish you a good read!

Preliminary Operations
Before tackling the topic of data transfer from iPhone to PC, you need to make sure iTunes is present on your computer. This software is essential so that data can be synchronized between Apple devices and Windows or Mac computers. This synchronization allows you to transfer, through the predefined tools of the operating system in use, multimedia elements, and documents, as well as the possibility of backing up and restore your iPhone.
Therefore, the exclusive use of this software is not required to perform the transfer of any data, but without iTunes, it is not possible to install the drivers of your iPhone and therefore access its internal memory.
Transfer Photos and Videos to PC
To transfer photos and videos from your iPhone to your computer, you can use the default tools of the operating system you are using. In the next lines, in fact, I will give you some tips that you can put into practice on your Windows computer, to transfer the multimedia files present in the iPhone memory.
Method 1 Use File Explorer in Windows
When you connect an iPhone to a Windows computer, after installing iTunes, you can choose to perform various operations for the transfer of multimedia elements from the smartphone to the PC. Among these, you can use the most immediate one, that is, the use of File Explorer.
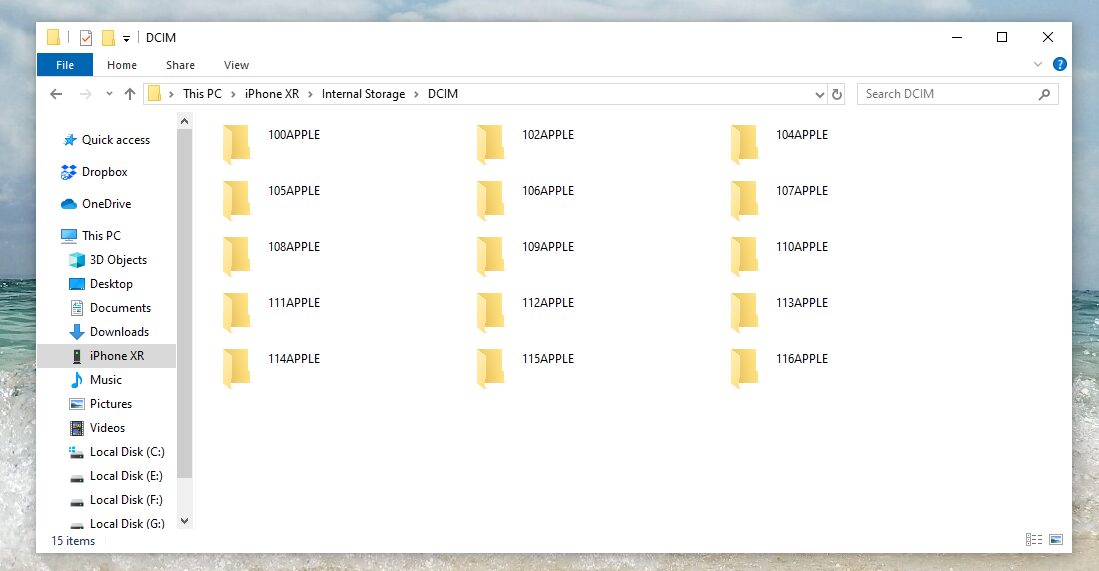
Then connect your iPhone to the computer and wait for it to be recognized. Open now File Explorer, through its icon with the symbol of a yellow folder that you find in the taskbar at the bottom. From the left sidebar, click on the item This PC and, in the Devices and drives section, double-click on the icon for your iPhone. Access now the Internal Storage > DCIM folders to view the archive of photos and videos, present in the memory of your smartphone.
You can also do this through the Windows Photo and Video Import tool. After connecting the iPhone to the computer, open File Explorer, as I indicated in the previous lines, and access the This PC section from the left sidebar of the window. Now find the icon of your iPhone in the Devices and drives section, right-click on it and choose the Import images and videos item from the menu that opens.
Now, wait for the analysis to end, make sure that the Review, organize and group the items to be imported box is checked and click the Next button. In the window that opens, put a checkmark on the elements to be imported (or activate the Select all box, to select all the elements that have been identified). Then press the Import button to perform the operation of importing the files into the Pictures folder of your computer. When the transfer is complete, a File Explorer window will open showing all the newly imported files.
Method 2 Use Photos Application in Windows 10
The second method that I recommend is to use the Photos application, already installed in Windows 10. Using the search bar that you can find at the bottom left of the taskbar, type the term photo and click on the corresponding result that refers to the application.
Once Photo is started, click on the Import button located in the upper right corner and choose the From a USB device item from the context menu. Through the newly opened window, you can view all the multimedia elements present in the memory of your iPhone.
Then put a checkmark next to the files to be imported, alternatively use the Select all buttons to select all the elements or Select new to highlight only the new elements present in the iPhone memory that has not been previously imported through the application Photos. You can customize the import by clicking on the Import setting item, which allows you to set the destination folder and the method of grouping the images according to the date, month or year.
After selecting the items you want to transfer to your computer, click the Import selected button and wait for the confirmation sound to complete the operation.
Method 3 Use IOTransfer
If you want to use other tools to transfer your data from iPhone to PC, I recommend solutions that take advantage of the Internet connection or the wireless connection, IOTransfer is one of the most optimal solutions.
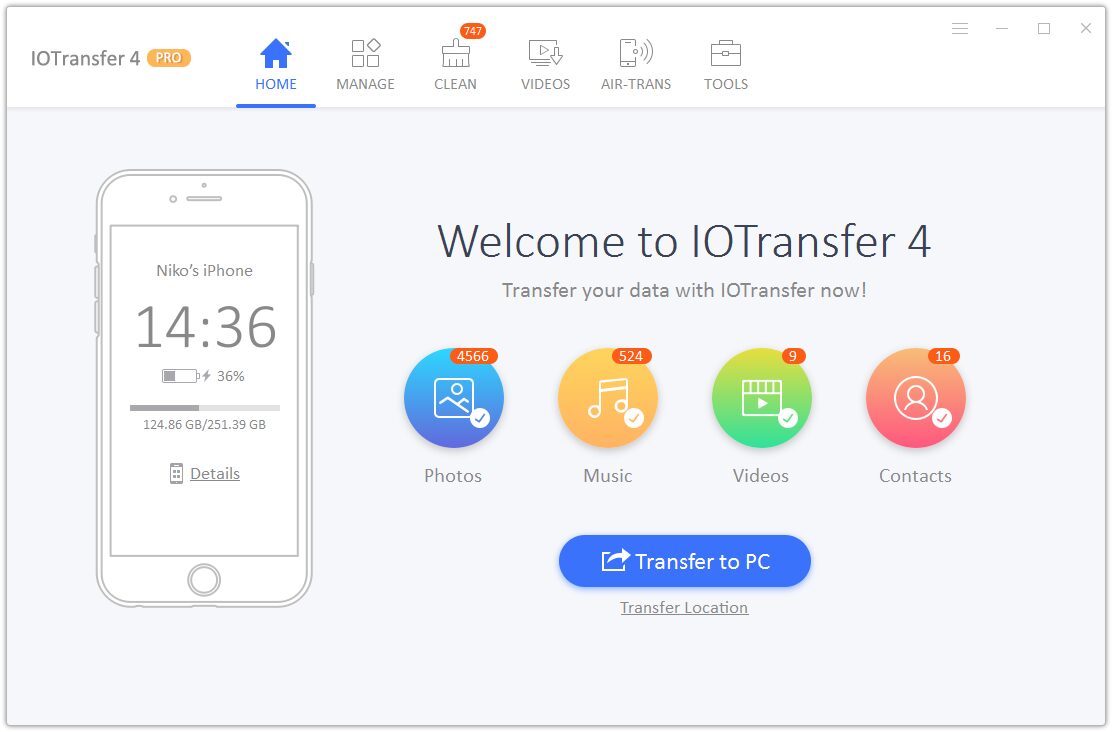
IOTransfer is a good iTunes alternative and iPhone management tool that enables you to transfer not only videos and photos, but also contacts, music, and other data between iOS devices and computers. Besides, you can use it to download videos from YouTube, Facebook, etc. and convert it to the compatible formats. Plus, you are also able to use it to create CIFs without watermarks.
To easily transfer videos, photos or other data from iPhone to computer, free download and install IOTransfer to your Windows 7/8/8.1/10. It works on iOS 8 or later. It’s easy to use that you can complete the transferring process just in 3 steps: Connecting your iPhone, Selecting the data, and Transferring. To provide you with more convenience, it offers another way to wirelessly transfer iPhone videos, photos, documents, etc. to a computer. If you want to know how to wirelessly transfer iPhone files to PC, you can refer to tutorial on website.

Transfer Documents to PC
Through iTunes software, you can use the File Sharing feature to copy documents from iPhone to a computer (and vice versa). Then connect your iPhone to your computer via Lightning cable or wirelessly and start iTunes, if it hasn’t opened automatically.
Now, click on the iPhone icon located at the top left, select the File sharing tab and wait a few seconds, for the list of apps that can take advantage of this feature to load.
From the App column, click on the application from which you want to export the documents to your computer and then select the files from the column alongside. Then drag them out of the iTunes application, transferring them to any folder on your computer’s hard disk.
Transfer Data with iCloud
You can also use iCloud cloud storage, to transfer data from your iPhone to your computer. To do this, you must first enable synchronization of your iPhone data with iCloud. Start your browser and access the iCloud.com site, logging in with your Apple account credentials. You may be asked for the authorization code, which you can view on the display of your smartphone.
The main iCloud panel is made up of several icons which contain different data relating to what they represent: for example, in the Photos section, if you have activated the iCloud Photo Library, you can view all the multimedia elements (photos and videos) present in the memory of your device and which have been synchronized in the cloud storage; in the iCloud Drive section, you can access the documents uploaded online instead. All these data are available for direct download to your computer. Other data, however, although accessible from the Web interface, can only be viewed, without the possibility of saving a copy directly on the computer.
